


Make Your GitHub Stand Out with a Custom Profile README
How do you make your GitHub profile stand out in a sea of over 100-million subscribers? GitHub has an answer with its Profile README feature. Let's explore this feature together.

According to Bing Search, GitHub has over 100-million users worldwide, with the majority based in the US, India, and China. It’s great to know that you’re in a sea of developers, but it’s extremely easy to start to feel quite small. So, if you’re starting out on GitHub like I am, how do you make yourself stand out?
I think a good place to start is a special feature that GitHub provides called a Profile README. By using your Profile README, it’s one of the easiest ways to show people who you are, what you are working on, and where to find more of your projects. No matter if it has to do with code, or any side projects that you’re working on.
Here’s the best part, it’s totally free, and it’s completely under your control. Let me explain…
What is the GitHub Profile README?
Well, the GitHub Profile README is a document that you create that holds a simple little bullet list of the things that interest you, the projects that you’re working on, and anything else that you want to share to the GitHub community. The document is then placed in a special GitHub Repository that you create, and it will show up when anyone looks at your profile.
If you create a repository with the exact same name as your GitHub username, GitHub treats it differently. It displays the contents of the README.md file right at the top of your profile page.
This means that you can write a short bio, list your skills, link to your outside blog, or other social media accounts, and even add GitHub animated headers if you’re feeling fancy.
It’s like a pinned Tweet meets a business card, but for developers and tech-minded creatives. It’s your five-second elevator speech. It’s what lets recruiters, and other hiring personnel, know more about you and helps them determine if you’re a good fit for their company.
🧡 All my writing is free — but you can support it.
If you enjoy what I’m creating and want to help me keep going, you can become a paid subscriber. It’s totally optional but deeply appreciated. Thanks.
Why Should You Bother?
First Impressions Matter: Here’s your chance to make a good first impression with someone (whoever they are) when they visit your GitHub profile page.
It Shows That You Care: It shows that you care enough to let people know what interests you, and the projects you’re working on.
You Can Link Out: You can link out to your blog, or your Mastodon, LinkedIn, Bluesky, or even the playlist that you’re listening to while you’re working on your current project.
It’s Great Writing Practice: And you know, good communication skills are going to be an asset to you if you’re looking to get hired somewhere.
Something to Remember: If you’re job hunting, freelancing, or just want to stand out in the sea of anonymous profiles, this gives people something to remember you by.
How to Set it Up?
Go to GitHub and create a new repository
Name it the same name as your GitHub username
For example, if your username is “janedev”, the repository name should also be “janedev.”
Check the box that says, “Initialize this repository with a README.”
Edit the README.md file and start writing.
You can choose to edit this file right there on GitHub in its editing feature, or you can clone this repo to your computer through GitHub Desktop, So, you can edit it on your computer in VSCode.
You’ll want to keep this README.md file up to date with your latest projects. But that’s it! GitHub will automatically show it on your profile.
What to Include in Your README.md File?
Well, first, the file is a MARKDOWN file, so, you’ll be writing this in MARKDOWN. If you’re unfamiliar with MARKDOWN, then this is a great place to start learning it. Because you’ll be using it in your GitHub projects as well. I’ll leave you with a video to get you started…
Don’t worry too much about learning MARKDOWN because it really is quite easy. Think of MARKDOWN as an even more simplified version of HTML. You’ll learn it in no time.
But as far as content is concerned, the sky’s the limit, really. But if you’re using your README.md for business purposes, then you’ll want a README file to reflect this.
Here’s mine, and the only thing that I mention about web development is that I’m a beginner. Once I create my first project, I’ll change this to be more Front-end focused, but for now, all I do is link to my outside projects.
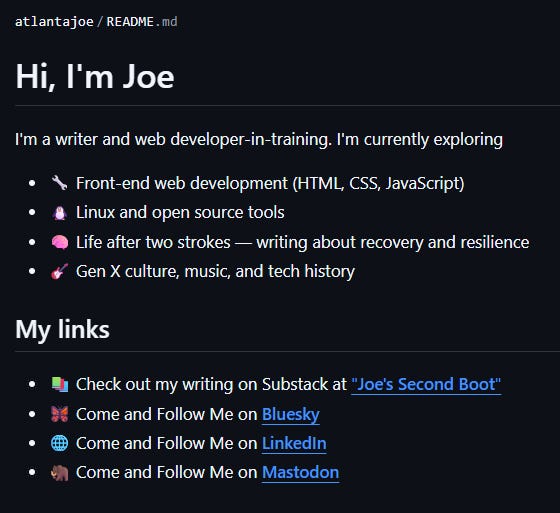
You can keep it plain and professional or throw in emoji’s, badges, GitHub Stats, or even a GIF of your cat. It’s your space. I’m choosing to keep mine simple for now, although I do get a little wild with the emojis, don’t I?
Spruce Up Your README File
Here are a few tools to help you level up your profile:
GitHub Stats Cards: Add contribution charts and language breakdowns.
Profile README Generator: A point and click builder.
Badge Maker: Create cool tech stack badges.
In a world where every developer has a GitHub account, a profile README.md file gives you a voice. It’s a small touch that can go a long way. Especially if you’re just starting out, changing careers, or building your presence online.
Here’s a link to my GitHub profile where you can see my Profile README, and the projects that I’m working on.
Until next time, take care.
🧡 All my writing is free — but you can support it.
If you enjoy what I’m creating and want to help me keep going, you can become a paid subscriber. It’s totally optional but deeply appreciated. Thanks.